{{getLoggedInUser() == undefined? getMsg('unknownUser') : getLoggedInUser()}}
Welcome to i-net software’s Database Wizard Guide for i-net Designer.
i-net Designer is a single tool which enables you to access, calculate, and analyze your enterprise data, and create challenging and feature-rich reports in a professional way.
The connecting link between your enterprise data and your report design is found in i-net Designer’s Database Wizard. It enables you to select the database connections you will be using for your report, choose specific tables from your database connections, create SQL commands, define joining links between tables, and show the current SQL statement or statements which will be sent to your database.
This guide will assist you in understanding and making the most of all that the Database Wizard has to offer, by leading you step by step through each of the available features.
The following terms will be used throughout this guide. Here are the explanations for what these terms mean:
Database connection – A database connection is any source of data ordered into table sources, each of which contains data ordered into rows and columns. A database connection is usually in the form of a direct connection to an actual database server, but using database files such as CSV as database connections is possible as well. i-net Clear Reports supports various types of database connections, such as MS SQL Server, MySQL, Oracle, PostgreSQL, DB2, Informix, CSV, and many others. See i-net Clear Reports documentation for a full list.
Table source – A table source is any source of data ordered into rows and columns, and is always provided by a database connection (see above). Possible table sources are database tables, views, stored procedures, and manual SQL commands.
Column – A column is a set of data values of a particular simple data type – one value for each row of the table containing the column. Every chosen table source for the report will offer its columns as possible database fields which can be used for the report. At the time the report is executed, these fields will be filled with data for each row (record) of the chosen data set.
Command – A command is a table source specified by an SQL statement. This statement returns a certain amount of rows and columns – the columns are then offered as the table sources available database fields.
Join – A join is a combination of records from two tables. These cause the data records of two table sources to be combined to a single data set, usually under a certain condition. There are various types of joins; the most common is the equal inner join, causing the records of the two table sources to be combined only if two fields are equal.
Stored Procedure – A stored procedure is a table source for a report, usually standing for one or more procedural constructs and/or embedded SQL statements which are stored on the database connection and are called by name.
View – A view is a table source for a report. It stands for a customized version of one or more tables on the database.
Table Area – The large area on the right of the Database Wizard where chosen table sources and their joins are displayed and can be modified.
Database Browser – The tree on the left of the Database Wizard where the chosen database connections can be browsed for available table sources which can be added to the report.
When you create a new empty report without report wizard for the first time (see Welcome Page), you should open the Database Wizard to add a connection. Note that you can later edit this connection in the Database Wizard.
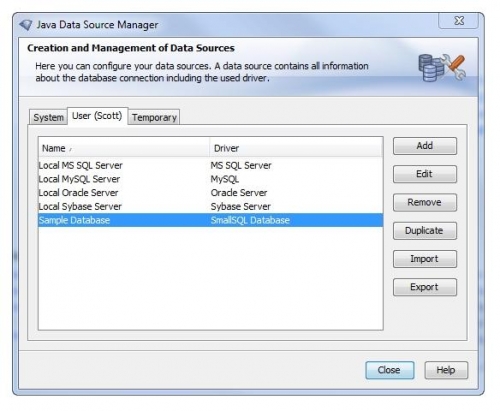
See the Data Source Manager Guide for more information on how to set up a connection, configure it, import existing data source configurations, as well as export configurations. Note the settings enable you to be able to save the database password in the configuration, as well as many other things.
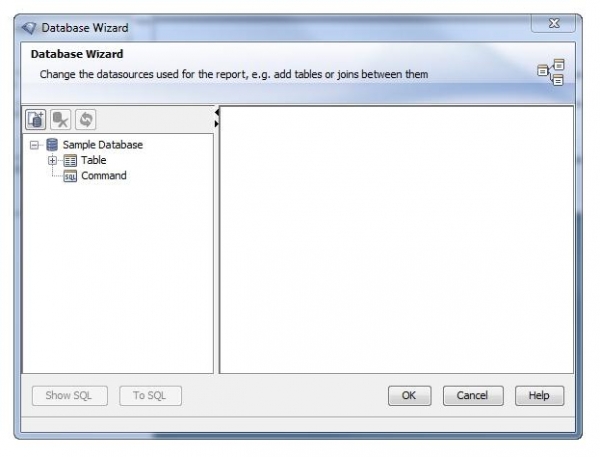
Now that you have chosen your database connection for your report, the Database Wizard will show the database connection in the database browser on the left-hand side of the window. Since you have not yet chosen any table sources for your report, the table area on the right is empty.
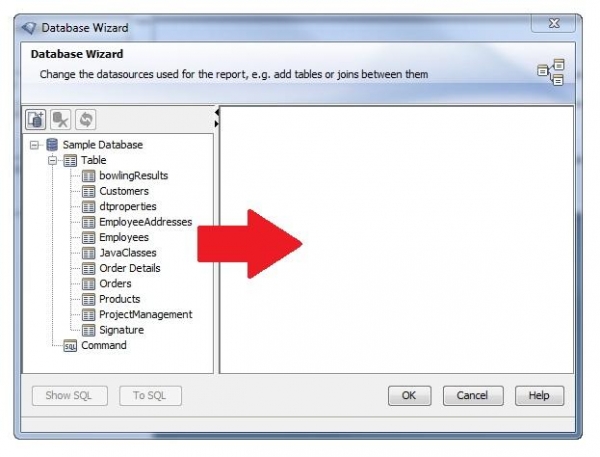
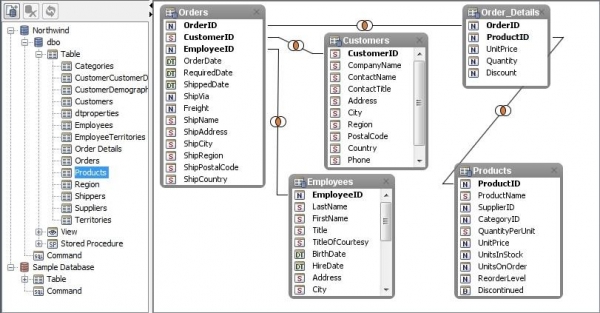
Let’s say we are using the "Sample Database" and wish to create a report of orders processed by a certain employee at a certain price. This means we will need three tables from our "Sample Database" database: Employees, Orders, and Order_Details.
To add these tables, simply open up the database browser’s tree, and select the table you wish (say, Employees). Now, either drag and drop "Employees" into the table area or double click "Employees" to add this table to your report. Repeat this for each table you wish to add.
In order for the correct records to be chosen – since we do not want to combine the record of an employee with a record of an order he did not process, for example – we must now set up the joining links between the tables.
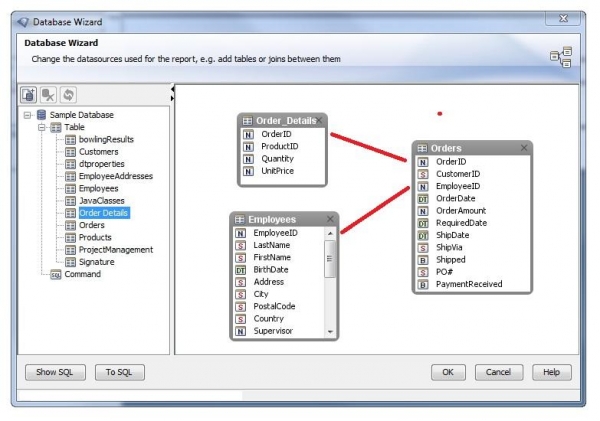
In our example case, we must join up Employees and Orders on the EmployeeID – so that order records and employee records are only combined, if the ID of the employee responsible for processing the order is equal to an employee’s ID. Also, we must join up Orders and Order_Details on OrderID, so that the details are only combined with the correct order.
To create a join between two tables, simple select the column of one of the tables you wish to join by clicking on it once. Now click again and drag it onto the column you wish to join it with. This will automatically create an inner equal join between the two columns.
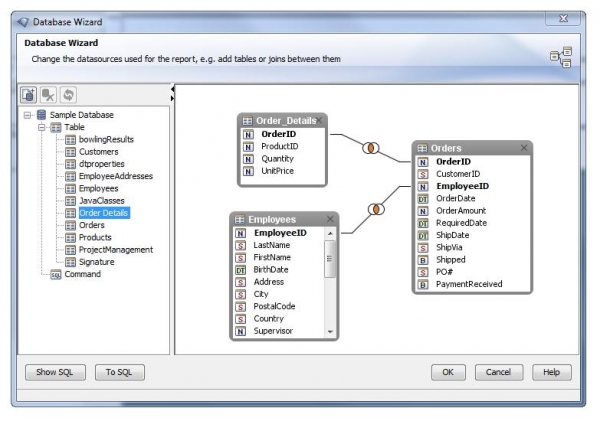
After doing this for both joins, we have now successfully set up a source for database columns which will be able to later fill our report.
The above steps of Tutorial 2 are sufficient for the majority of simple reports. However, at some times it may be better to manually enter an SQL statement which is to be used as a table source. This may be because you want to take advantage of a specialized function of your database, or because you’d like to use an SQL statement of your own rather than having it be automatically generated by i-net Clear Reports.
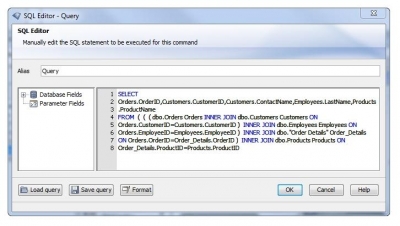
To create a new SQL command, simply open the database browser of the database connection you wish to add an SQL command for, and double click on the node "Command". This will open up a simple SQL Editor where you can enter the name you would like the command to have, and also where you can enter or paste your SQL statement.
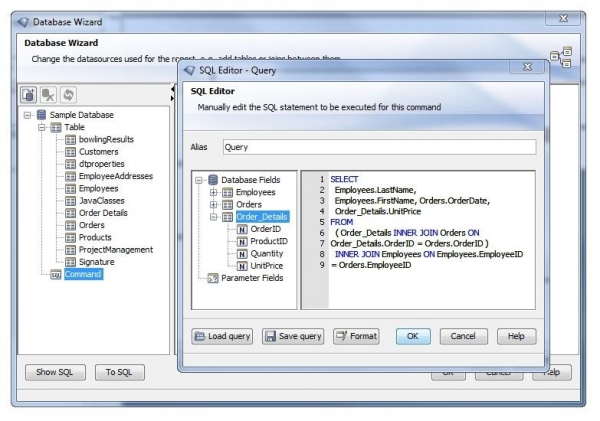
If it is a valid SELECT-type statement, this SQL will be sent to your database suffixed with a "1=0" in the WHERE part of the statement, so that only the column names are extracted. These are then placed into a new table source.
This allows for liberal use of the AS keyword to provide for very readable column names. An example would be adding the following command for the "Sample Database":
SELECT e.LastName as EmpLastName,
	od.OrderID,
	od.Quantity * od.UnitPrice AS TotalOrderPrice,
	p.ProductName
FROM( (Employees e
INNER JOIN Orders o
	ON o.EmployeeID = e.EmployeeID )
INNER JOIN `Order Details` od
	ON o.OrderID = od.OrderID )
INNER JOIN Products AS p
ON od.ProductID = p.ProductID
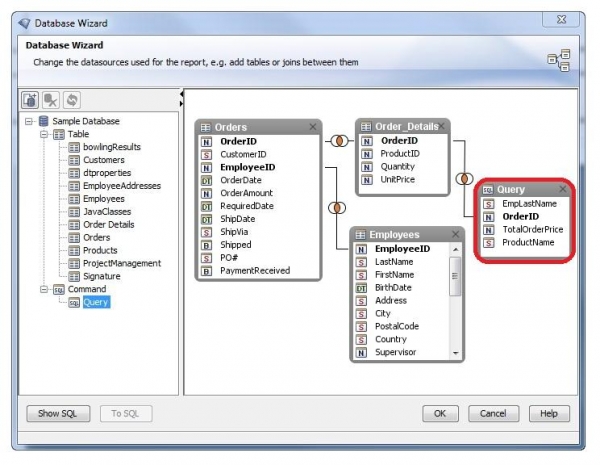
This will create a table source with the columns EmpLastName, OrderID, TotalOrderPrice, and ProductName, which you can use as you would any other table source. In a sense, you are creating a pseudo-view for your report, which is not stored on your database but within your report, and can be used to retrieve data on your terms.
Combining all things shown so far, as well as showing further features, let us look at a more complicated, practical example, and how the Database Wizard makes this possible:
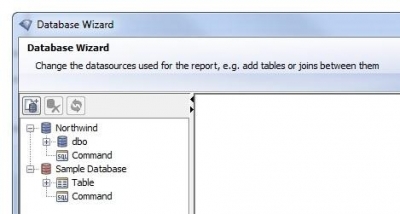
Say we have two databases – in one is our standard employee / customer / order database, in a second one we have a large set of customer information combined with regional data such as city population. Our goal is to create a report of information resulting from cross-checking order information with our customer information on our second database – say, a list of all orders made by customers living in a city of a population of 10,000 or less, including the employees responsible for the orders, and the product name sold in the order.
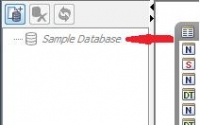
Our first step is to set up our order database as our first database connection. We then add our second database connection by double clicking on "New Connection...", and entering the data for this second database. In the database browser tree, we now have two database connections to choose our table sources from (see image 8).
By either double clicking, or by highlighting and then clicking on Add, we select the table sources "Orders", "Order Details", "Employees", "Products", and "Customers" from our first database.
We now join the following columns:
As you can see, this leads to quite a web of tables. However, there is a function in Database Wizard to simplify this – since we only will need a small part of the columns of these tables, we can convert these table sources to a single SQL command called "OrderInfo". To do this, simply select the node "Northwind" and click on "To SQL...".
This will open an SQL Editor dialog and will fill it with the current SQL statement – if we are not using any fields in our report yet, this box will be empty, since no SQL statement is as of yet being sent to the database.
All we need to add or edit is which columns to select, so we insert the columns "LastName" from Employees, "OrderID" from Orders, "ProductName" from Products, "CustomerID" as well as "ContactName" from Customers into the SQL statement, and specify the joins we wish to use (see image 10). After clicking on OK, this will convert all our current table sources into a single table source, making it much easier to work.
Now we still need the tables from our second database connection, "CustList" and "Cities". We join:
We now have completed our goal – we are supplying our report with the data we need to create the report we want, from two databases - all in about 4 minutes!
There are two ways to accomplish this.
One is by specifying a "Record Selection Formula" in Crystal or Basic syntax by choosing the menu point "Record Selection Filter..." under the "Report" menu. An example would be that you want to filter out all Employees whose salary is below $60,000 – simply specify "{Employees.Salary} >= 60000" as your record selection formula.
The other solution would be to create an SQL command (see chapter Creating a Custom SQL Command) and include a specific WHERE clause in your SQL statement, such as "...WHERE Employees.Salary >= 60000".
This error message means that somewhere in your report, you are using a field of this table. This makes it impossible to delete the used table, because it would render your report useless – the data your report is relying on would be gone.
If you really want to delete this table source, you will first have to remove all fields referring to the table source from your report.
For example, say you want to remove the table "Employees", but you are referring to "EmployeeID" and "LastName" in one of your formulas. Simply either change your formula to no longer refer to these fields, or delete your formula.
When a report is first opened, the connection is not opened until needed. This allows you to make changes to your report without having to connect to your database first, a process which can take some time, depending on the database.
If you would like to connect to your database, simply right-click on the gray database connection, and select the option "Activate Connection" – this will cause i-net Designer to connect to your database and show its available database fields.
To do this, simply right-click on the command whose SQL you wish to modify, and select "Edit" – this will open up the "SQL Editor" with the commands current SQL and will allow you to edit it.
Each table source has the option "Set Location" in its context menu, which can be reached by simply right-clicking on the table source.
Note that the new alias must only contain letters, numbers, spaces, or underscores, and also must begin with a letter – that means "1Cus" is not allowed, nor is "Cus$".
There are a couple possibilities – one is our online i-net Clear Reports FAQ, located at:
http://www.inetsoftware.de/documentation/clear-reports/online-help/support/faq/index.html
If you do not find your answer there, you can write an email to the i-net Designer support team at: designer@inetsoftware.de.