{{getLoggedInUser() == undefined? getMsg('unknownUser') : getLoggedInUser()}}
Security is an important feature for reporting software. There are many conceivable cases where it would be necessary to restrict the rights on the reports. You may not want all users to be able to execute just any report and to thereby gain access to almost all data in your database. This can be configured using the report permissions in the report repository.
It might also be necessary to limit the locations from which it is possible to take reports and execute them. This will prevent someone from executing unknown reports on the report server. This can be configured using Report Locations.
With Permissions it is possible to control the access to the remote features and to allow access to all reports.
i-net Clear Reports does not have its own login database. It instead uses the login information on the current system or external servers.
There are the following 2 security mechanisms available.
With report locations you can limit the locations from which reports can be loaded for execution. Only reports from the given locations and their sub-folders will be permitted to be executed. This does not require any user information. The default option is that it is possible to open reports from all local (server) and file locations.
With report permissions it is possible to set access rights for specific users or user roles in the repository browser. This requires the login information of the current user. There are several ways to receive this login information:
The concepts are described below.
If you want to protect your reports or parts of the reports from anonymous access, you'll have to set a valid login configuration for i-net Clear Reports. Installing i-net Clear Reports can be done on any server with at least Java 7 installed. Integration with Application Server or Web servers is possible but not necessary. Depending on the selected authentication method an external authentication provider may be required.
In order to use the security features of i-net Clear Reports, you'll have to set up an authentication method. The method to be used can be set while installing the product and in the configuration manager on the 'Login' panel.
i-net Clear Reports provides a large set of authentication methods. Please note that some of them depend on the installed operating system and/or the server application in use.
i-net Clear Reports provides the following authentication methods (login types) by default:
ldap://MyLdapServer:389/ or
ldaps://MyLdapServer:636/ (with SSL).
If the authentication method is set to "Automatic" or "External Webserver", a URL to a Login Script may be defined. You can use the default LoginServlet (single server only) by not setting a URL or an external login script. To verify the correctness of the login URL, please enter this URL in a normal web browser:
http://localhost/clearreports/LoginServlet

# or

http://localhost/YourPath/login.aspx
Now your browser should request for login information. How this request is presented depends on how you have configured the login of your web application server (BASIC, FORM, etc. ). With a successful login in the browser you will receive an XML file like:
<properties>
	<entry key="username">scott</entry>
</properties>
If you see an error page, your configuration is incorrect. In that case and if you're using the LoginServlet, a change in web.xml, which is located in the reporting.war, can be necessary depending on the used application server. See the documentation of your application server or servlet engine for more details.
Note: If the login script administrates the user by domain and user name (as in "DOMAIN/User"), the permissions have to be configured the same way later on.
This authentication method is only available if i-net Clear Reports is installed in an application server or servlet engine. The configuration of the users and roles for that method depends on the application server.
Important: Please refer to the documentation of the application server for setting up the credentials.
Some application server allow to define different credential stores for each application or to use a single store. This is important if you're planning to use Single Sign On.
Once you've defined the users and roles in the realm of your application server, you have to modify the web.xml of i-net Clear Reports to use the roles in the application as well. The location of this file depends on the application server. Add the roles to be used to the XML file:
   ...
   <security-role>
      <role-name>users</role-name>
   </security-role>
   <security-role>
      <role-name>guests</role-name>
   </security-role>
</web-app>
As of Version 14 i-net Clear Reports allows to extend the authentication methods by adding plugins to the application. To create a custom authentication mechanism, you'll have to create a plugin as described in the "Server Programming Guide".
The Plugin has to implement the following Interfaces:
com.inet.authentication.AuthenticationProvider
com.inet.authentication.WebUserInfo
com.inet.authentication.UsersAndGroupsProvider
com.inet.plugin.ServerPlugin
These interfaces are located in the inetcore.jar in the 'core' folder of i-net Clear Reports. Their API documentation can be found either in the installed documentation or online.
To enable i-net Clear Reports to load and use your AuthenticationProvider, your implementation of the ServerPlugin interface requires at least:
@Override
public void registerExtension( ServerPluginManager spm ) {
    spm.register( AuthenticationProvider.class, new MyCustomAuthenticationProvider() );
}
The methods init, reset and restart can be left empty.
When using a website or web application combined with i-net Clear Reports it's recommended to only let the user log-in once. The solution for this scenario depends on your server infrastructure and selected authentication method.
In this configuration, i-net Clear Reports would be running in an application server that presents your web front-end or web application as well. It's recommended to set the authentication method to 'Internal web server' for that use case. This enables i-net Clear Reports to share the session and authentication with your web application.
| Pro | Contra |
|---|---|
| Easy and seamless integration with web applications | Requries an application server |
If you require another authentication method or i-net Clear Reports runs in a separate process (e.g. IIS or Apache with PHP), make sure that i-net Clear Reports is accessed by the same host name as your front-end server. Furthermore, the credential store has to be the same for the web application and i-net Clear Reports. This is required to enable the client browser to automatically resend the authentication when switching between the web application and i-net Clear Reports. The user won't be notified about this re-login so the user experience is seamless.
| Pro | Contra |
|---|---|
| Works with almost any web server | Requires basic or NTLM authentication |
| Both server applications must have the same credentials base |
In case you want to install i-net Clear Reports on a firewall-protected back-end server, a different setup for authentication has to be used. Since your web site or application is hosted on another (front-end) server, i-net Clear Reports has to contact this server to share the authentication. Make sure, this connection is not blocked by the firewall as well.
To set up this solution please:
How it works in production:

It's important in this scenario, that request 1. and 2. pass all cookies (session ID) and header (authentication header). This allows the Login Script on the front-end server to identify a user by session cookie or by authentication.
| Pro | Contra |
|---|---|
| Allows Firewall protection for the back-end server | Additional load on the front-end server |
| Single entry point (host) for users | May require a custom proxy implementation |
In this scenario the web site/application server and the server hosting i-net Clear Reports are both connected to the same network or the internet. The user can directly access both servers. So in contrast to the front-end / back-end architecture, there is no proxy which can pass the authentication or session data from the web site/application server to the reporting server. So passing the session cookie has to be done by the web site running in the browser of the client/user. For that reason, a front-end / back-end solution is recommended in most cases.
To set up this solution please:
How it works in production:
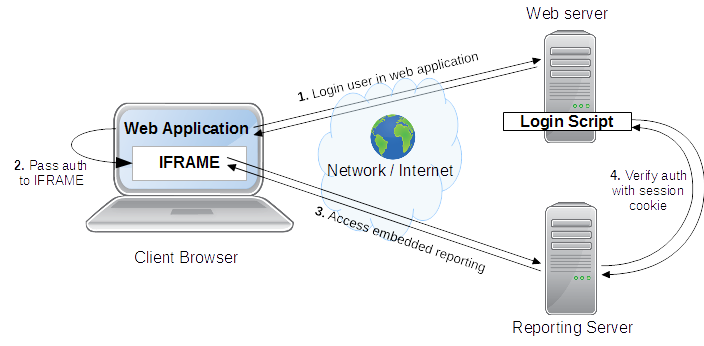
As you can see, the most critical point here is to pass the session from your web application to the reporting IFRAME. Most browsers will try to prevent you from re-using a cookie for another host. So it requires sophisticated JavaScript knowledge to implement such solution.
Alternatively you may pass the required session data as URL parameters to the IFRAME. But since i-net Clear Reports only passes Cookies and HTTP header fields to the Login Script, this would require to extend the reporting server with a plugin to convert the URL parameters to a cookie for authentication.
| Pro | Contra |
|---|---|
| No proxy required | Requires sophisticated JavaScript or Java coding |
| No extra load for the web server | Exposes back-end architecture |
The authentication method 'External web server' requires the requested location to perform the authentication and to return a valid response in XML format.
To enable the external web server to authenticate the user, i-net Clear Reports sends all cookies (e.g. the session cookie) and the HTTP authentication header of the original request along with it's request to the authentication server.
In case the authentication server is able to authenticate the user, it has to respond with XML content that contains the user's username, e.g. sending a valid authentication for user "JohnDoe", the authentication server should respond:
<?xml version="1.0" encoding="UTF-8"?>
<!DOCTYPE properties SYSTEM "http://java.sun.com/dtd/properties.dtd">
<properties>
<entry key="username">JohnDoe</entry>
</properties>
Important: You have to make sure that the user name is always returned in way that is unique to the system (e.g. always make it lowercase - even if the user logs in with uppercase letters) - the reason behind this is: i-net Clear Reports supports case-insensitivity in every permission checking context, but it will respect folder names case-sensitively. If you had a user named "JohnDoe" and he logs into the system with "johndoe" there would be two different home directories in the repository though you meant the same user.
To check whether a user is in certain roles, i-net Clear Reports will attach the roles to check as parameters to the request URL. The server than has to check for each role and extend the XML appropriately:
REQUEST:
http://<YourServer>/login.aspx?abc=&somerole=

RESPONSE:
<?xml version="1.0" encoding="UTF-8"?>
<!DOCTYPE properties SYSTEM "http://java.sun.com/dtd/properties.dtd">
<properties>
<entry key="username">JohnDoe</entry>
<entry key="abc">False</entry>
<entry key="somerole">True</entry>
</properties>
Using roles is a convenient way to specify restrictions for many users at once. Furthermore you can even use the roles in the formulas of a report to adapt the report to the executing user. The formula function to check a role is isWebUserInRole( <roleName> ).
For the most common cases of authentication servers running ASP.NET, PHP or Java Server Pages, please use the following samples as a reference:
Create a file with the extension *.aspx (e.g. login.aspx) in the IIS and copy the following script into this file. Enable the authentication method "Basic authentication" for this .aspx file in the IIS configuration.
An installed Microsoft .Net Framework version 2.0 or higher is required to execute this script.
<%@ Page Language=VB ResponseEncoding="utf-8" %>
<%
If User.Identity.Name = "" Then
	Response.Write( "401 Access Denied" )
	Response.Status = "401 Access Denied"
	Response.End
end if
Response.ContentType = "text/xml; charset=utf-8"

Response.Write( "<?xml version=""1.0"" encoding=""UTF-8""?>" & Chr(10))
Response.Write( "<!DOCTYPE properties SYSTEM ""http://java.sun.com/dtd/properties.dtd"">" & Chr(10))
Response.Write( "<properties>" & Chr(10))

Response.Write( "<entry key=""username"">" & Server.HTMLEncode(User.Identity.Name) & "</entry>" & Chr(10) )

Dim Key
For Each Key In Request.QueryString
    if Key <> "" Then
        Try
            Response.Write("<entry key=""" & Server.HtmlEncode(Key) & """>" & Server.HtmlEncode(User.IsInRole(Key)) & "</entry>" & Chr(10))
        Catch
            Response.Write("<entry key=""" & Server.HtmlEncode(Key) & """>false</entry>" & Chr(10))
        End Try
    End If
Next

For Each Key In Request.Form
    if Key <> "" Then
        Try
            Response.Write("<entry key=""" & Server.HtmlEncode(Key) & """>" & Server.HtmlEncode(User.IsInRole(Key)) & "</entry>" & Chr(10))
        Catch
            Response.Write("<entry key=""" & Server.HtmlEncode(Key) & """>false</entry>" & Chr(10))
        End Try
    End If
Next
Response.Write( "</properties>" & Chr(10))
%>
Create a file with the extension *.jsp and copy it into any web context.
<%@page language="java" contentType="text/xml; charset=utf-8" pageEncoding="UTF-8"
import="java.security.Principal"
import="java.io.*"
import="java.util.*"

%><%!
public static String encode(String s){
	StringBuilder out = new StringBuilder();
	for(int i=0; i<s.length(); i++){
		char c = s.charAt(i);
		if(c > 127 || c=='"' || c=='<' || c=='>'){
			out.append("&#"+(int)c+";");
		}else{
			out.append(c);
		}
	}
    return out.toString();
}

%><?xml version="1.0" encoding="UTF-8"?>
<!DOCTYPE properties SYSTEM "http://java.sun.com/dtd/properties.dtd">
<properties>
<%
	Principal p = request.getUserPrincipal();
	if( p != null ){
		out.write( "<entry key=\"username\">" + encode( p.getName() ) + "</entry>\n" );
	}

	Enumeration e = request.getParameterNames();
	while(e.hasMoreElements()){
		String key = (String)e.nextElement();
		key = new String( key.getBytes("ISO8859_1"), "UTF8");
		out.write( "<entry key=\"" + encode( key ) + "\">" + request.isUserInRole(key) + "</entry>\n" );
	}
%>
</properties>
Create the files .htaccess, .htpasswd and .htgroups. This file can look like this:
.htaccess
# dont allow htaccess and htpasswd
<Files ~ "^.(htaccess|htpasswd)$">
deny from all
</Files>

# .htpasswd contains the password and users
AuthUserFile /opt/lampp/htdocs/.htpasswd
AuthGroupFile /opt/lampp/htdocs/.htgroups
AuthName "Please enter your ID and password"
AuthType Basic
require valid-user
.htpasswd - A user test with password test.
test:WCt/yYmXR2kLA
.htgroups
admin: test
Create a php login file with the following content:
<?php
  // This is the .htgroups file - the web server requires to have read permission for this file!
  $AuthGroupFile = file("/path/to/.htgroups");

  // If the Apache has AUTH Info, set them for PHP as well
  if (!empty($_SERVER['AUTH_USER']))
  {
     $_SERVER['PHP_AUTH_USER'] = $_SERVER['AUTH_USER'];
     $_SERVER['PHP_AUTH_PW']   = $_SERVER['AUTH_PASSWORD'];
  } else if (!empty($_SERVER['REMOTE_USER'])){
    $_SERVER['PHP_AUTH_USER'] = $_SERVER['REMOTE_USER'];
  }

  // Check whether someone has authenticated - if not, request another Basic Authentication
  if (!isset($_SERVER['PHP_AUTH_USER'])) {
    header('WWW-Authenticate: Basic realm="Server Authentication"');
    header('HTTP/1.0 401 Unauthorized');
    echo 'Access Denied';
    exit;
  }

  // Here you may insert additional checks for the user, like querying a database.
  // Alternatively this can be done via .htaccess in apache

  $return = '';
  $return .= '<entry key="username">' . strtolower(htmlentities($_SERVER['PHP_AUTH_USER'])) . "</entry>\n";

  foreach ( $_REQUEST AS $key => $value ) {
    $status = !preg_grep("/$key:.*?\s" . htmlentities($_SERVER['PHP_AUTH_USER'])  . "(\s.*?)?$/", $AuthGroupFile) ? 'false' : 'true';
    $return .= '<entry key="' . htmlentities($key) . '">' . $status . "</entry>\n";
        }

  header('Content-Type: text/xml; charset=utf-8');
  print <<<OUTPUT
<?xml version="1.0" encoding="UTF-8"?>
<!DOCTYPE properties SYSTEM "http://java.sun.com/dtd/properties.dtd">
<properties>
$return
</properties>
OUTPUT;
?>
Once you've configured an authentication method other than 'Master Password' you can configure the permissions in the configuration manager and the report permissions in the repository browser.
You can enable the check of the Report Locations in the i-net Clear Reports Configuration Manager.
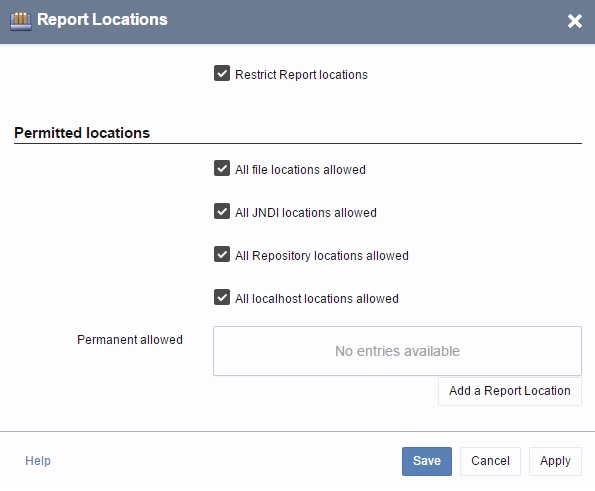
If you enable the check of the Report Locations then you should enable "All file locations allowed", "All localhost locations allowed" or you must add at least one URL from that reports can be loaded by i-net Clear Reports.
You can enable the option "Restrict Permissions" in the i-net Clear Reports - Configuration Manager dialog "Permissions".
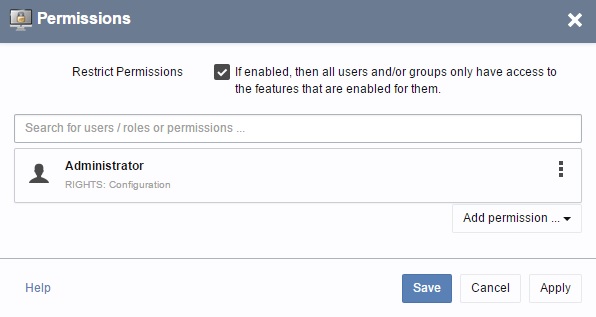
If you enable "Restrict Permissions", you should configure at least one user or group for the feature "Configuration" so that it is possible for this user to execute the Configuration Manager in the Remote Interface. If you do not, no one will be able to access the Configuration Manager except by using the Configuration Recovery Tool which is located in the installation directory.
With permissions you can restrict the access to certain parts of the system and remote application such as ad hoc reporting. They permissions can be administrated using the Remote Configuration Manager.
The features are web applications in the i-net Clear Reports Remote Interface. Depending on the activated plugins the following permissions can be granted to a user / group:
If the configuration has no valid authentication method set, you can log in to the Remote Interface as the system administrator using the master password. This user has no restrictions, each feature will be visible and can be used.
By default, any report in any location (local file system, external web server etc.) can be executed on your i-net Clear Reports server. That can make things easy for your employees and customers, but it can be a security issue as well.
To solve this problem and reduce security risks, you can grant access for certain report locations only. The report locations consist of a list of folders and URL's which contains report files that can be executed.
The Report Repository is a feature of i-net Clear Reports Plus which allows streamlined and simple central storage and execution of reports on the report server.
In addition to the permission "Execute All Reports" in the Configuration Manager, users with appropriate privileges can also manage report permissions directly from the Repository Browser. With the report permissions it is possible to restrict the access to reports in the repository depending on the currently logged in user.
The rights on a folder in the repository will be inherited by subfolders. It is possible to list files in the repository when only an execution permission is granted. The read permission is not necessary anymore to list the report files.
A pattern can be used for report file names. It can contain characters, the asterisk symbol (*) as a wildcard for any number of symbols or the question mark (?) as a wildcard for a single symbol. After a pattern has been created, you have to define at least one user name or group for the pattern. For users and groups you can use the asterisk symbol (*) as a wildcard as well. For instance if the group "admin" should have access to all reports, you have to create a new global pattern "*" for "all reports" and then give the group "admin" access to this pattern (which will match all reports).
The following permissions can be set:
For detailed information please have a look at the Repository Guide.
To test the security functions with i-net Designer, you can set the current web user name and its roles in the section "Virtual Permissions" of the "Designer Options..." (see menu "Options | Designer Options...") . Here you can enter the simulated user name and user roles.
The authentication credential can be used within reports using formula functions. The following 3 functions are available in the node "Security Functions" of the Formula Editor:
Using these functions in formulas, you can filter records in the Record Selection Formula, hide fields or sections, etc., depending on the WebUserName and/or the Role of the current user. With the FireAccessDenied function it is even possible to cancel the report execution if the current user is not logged on or is not a member of the specified roles (groups). It is possible to test these functions within the i-net Designer if "Restrict Permissions" is activated in the permission panel of the configuration used by i-net Designer and if a user name and/or roles have been specified in the "Designer Options" dialog.
In case you have sensitive data in your database for different users and you want any user to only be able too see his or her own data then you can filter the data. A typical example is a ticket or billing system.
If you have a table column with the user names you could for instance set the Record Selection Formula to:
if WebUserName() = "" then
	fireAccessDenied()
else
	{YourTable.username} = WebUserName();
The call of the function fireAccessDenied is used to force a login for the user if they are not logged in yet.
Note that i-net Clear Reports also has some other security options not related to a login. These are located in the section "Restrictions" of the dialog "Document Properties" in i-net Designer and include the following:

For security reasons the property "Allow unknown Data Sources" can be disabled. You can find it in to the configuration dialog "Behavior".
If this property is disabled, it is not possible to execute reports containing an unknown datasource. A data source is unknown if no data source configuration exists with this name on the report server. This will prevent the usage of report-defined databases and possibly insecure connections.